Back to Planned Maintenance Main Menu
Using a PM Template
Watch the Video Tutorial:
Using a PM Template to Create a New Schedule
- Click the New Schedule tab.
- Enter a PM Schedule Title in Step 1.
- Select a Classification in Step 2.
- Fill out Steps 3 through 7 as necessary for the schedule you are creating.
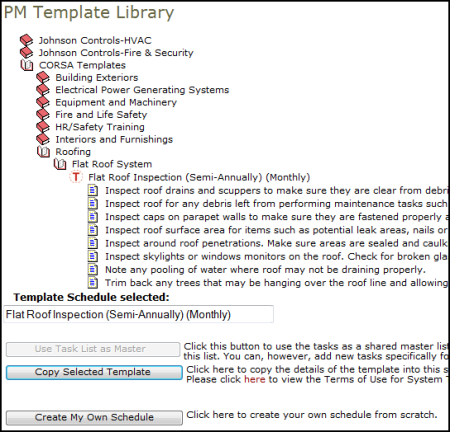
- On Step 8, you will see the PM Template Library. Red books are Template books that have been purchased from Dude Solutions. Blue books are the Template books that you have made to store the templates you have created.
- Click on a book to open it. Drill down until you find a template you want to use and open it to show the tasks.

- The Template name will populate the Template Schedule selected field.
- If the Template icon has an
 on it, this indicates that the template has been saved as a Master template and can be used as such on this schedule. If the template icon has a
  , this indicates a regular template that cannot be used as a Master.
 - If the Use Task List as Master button is highlighted, you can choose to use this template as a Master. Click this button to copy the template details into your schedule and lock down the Master task list. Master tasks can only be changed through the template rather than from within the schedule. However, you can add new tasks through the schedule.
- If you do not want to use the template as a Master or if that is not an option, click Copy Selected Template to copy the template details into your schedule.

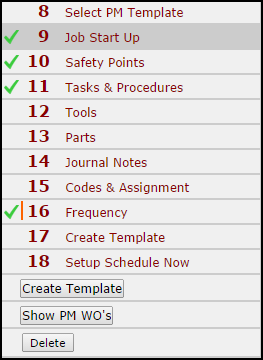
- Once you have selected a template and copied it into your schedule, you will see check marks on the steps where the template entered information.
- Click on these steps to check that the information is correct.

- If needed, make additions or modifications to the information entered by the template. Make sure to click Next Step on each step to save your changes.
- Make sure to check Step 15 (Define Codes & Assignment) and Step 16 (Define Frequency) to ensure they are correct for this schedule.
- Skip Step 17. Since you used a template to create this schedule, you do not need to create another template for it.
- In Step 18, click Setup Schedule Now to activate the schedule.

